|
 |
 SSC
Users Guide - Table of Contents
Location specific data output is provided by the Locator.
At the heart of the Tabular Output system is the "Command Menu" which is displayed at the bottom of every screen. Users should be aware that the "Command Menu" should be their primary means of navigating through the Locator Tabular Ouput portion of the Satellite Situation Center.

Standard Interface Command Menu
As pictured above the menu is divided into four areas. The numbers beside each of the first three areas are intended to provide the user with a reminder of the order in which these options should be accessed. Each option will be described in detail in the following sections.
2.3.1 Spacecraft/Time Range Selection Screen
The "Spacecraft/Time Range Selection" option presents the screen that is first displayed by the Locator Tabular Output.

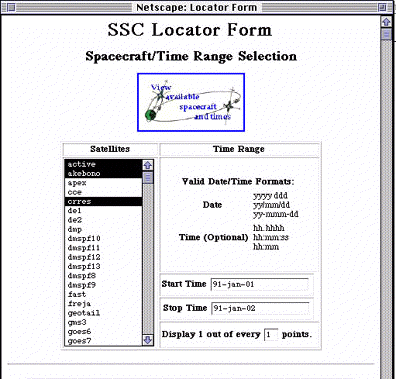
Standard Interface Spacecraft Selection Screen
This screen allows the selection of one or more spacecraft and an associated time range. See the section navigation tips for how to select more than one spacecraft. The date and time range may be entered in any combinations of the formats displayed below the "Time Range" label. Entering the time is also optional. If the time is not entered the system will assume a time of 00:00:00 hours.
The time range specifed must be valid for ALL the selected spacecraft. To view the valid time ranges for all of the available spacecraft the user may select the image at the top of the page titled "Available Spacecraft and Times". This will display the Database Information Page.
2.3.1.2 Database Information
The Database Information option displays a list of the entire SSC database holdings, both on-line and off-line. In general, off-line data consists of all ephemeris data prior to 1991. To access off-line data, contact the user support office at the location specified in the Introduction to this guide.
The list displays the satellite Name, Resolution of the ephemeris data in seconds, Time Range for which ephemeris data is available, and an indication of whether the data is Predictive or Definitive.
This screen also provides the capability to reduce the volume of the tabular output. This is accomplished by changing the value in the field labeled:
"Display1 out of every X points"
This is refered to as the "Database Resolution Factor" and will cause the output to only print out every Xth point.
Once the desired selections have been made on this screen the user should proceed to the "Output Options" screen via the button bearing the same name. If the parameters entered on the first screen are not a valid combination the user will be returned to the "Spacecraft/Time Range Selection Screen" with an appropriate error message displayed at the top.
2.3.2 Output Options
The "Output Options" screen allows the user to specify what values will appear on the output screen.

Standard Interface Output Options Screen
As shown in the figure above the user is presented with a wide array of options. Down the left hand side are the available coordinate systems that the software can format the output of the ephemeris data in. In the case shown the output will contain the XYZ, and Lat and Lon for both the GEI/TOD and the GEI/J2000 coordinate systems. The first two columns are provided as a short cut for selecting X,Y and Z as well as Lat and Lon for output. Selection of any of the additional options will result in those values being displayed on the output as well.
The selection for output of GEO and/or GM coordinates of magnetic field line footpoints in either magnetic hemisphere (i.e. resulting from a north or south magnetic field line trace) may be obtained by selecting the appropriate checkboxes at the bottom of the screen. The field line in question is that which passes through a spacecraft at a given point in time. In addition to field line footpoints, the arc length of the line from the spacecraft to either footpoint can also be obtained.
Once the user has selected the output for the locator run the system will produce valid output. The next sections are optional and deal with reducing the output by filtering on values that will be output by the software as well as the format of the output.
2.3.3 Filtering Options
If the user selects "Filtering Options" the following screen will be displayed.

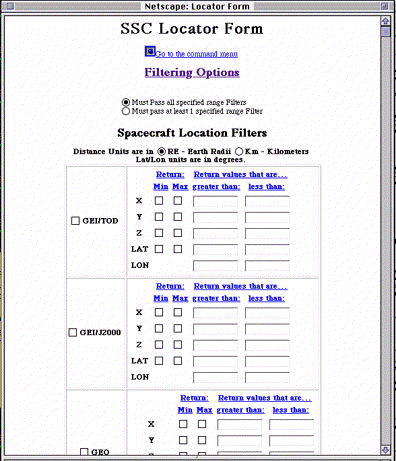
Standard Interface Filtering Options Screen
This form allows one to specify constraints on the data that is to be generated. The components listed down the left side of the form pertain to the coordinate system whose name is displayed in the form's title. The contents of this form will change depending on what was selected for output on the "Output Options" screen.
There are two types of filters.
Those listed under the column labeled: "Return: Mns Mxs" when selected, allow one to have returned in the output the lines of data that contain the item which is the minimum and/or maximum value of its kind.
Under the column labeled:
"Return values that are..."
"greater than: less than:"
there are fields that allow one to specify a range in which the computed value must lie if it is to become part of the output.
Regions Filter
At the bottom of the screen there may be one or more "Region Filters" depending on what was selected on the "Output Options" screen.
"Regions" denotes a naming convention of three dimensional and two dimensional zones that are associated with a spacecraft's location for a particular point in time. The "Regions Filter" section of the screen screen displays the four type(s) of regions that can be generated. The specific regions that constitute each region type are listed below. When in the 'Regions Filter' screen, a selection of a region type will display a selectable list of the regions specific to that region type.
Selecting specific regions will constrain the displayed results to spacecraft locations that are in at least one of those selected regions for a particular region type. If the request "meet 'ALL' region filters" has been made, then the displayed results will be constrained to spacecraft locations that are in at least one of the selected regions OF EACH REGION TYPE for which specific regions have been specified.
- SPACECRAFT REGIONS - (3 dimensional zones) Such a region is
based on the spacecraft's position. A spacecraft can occupy only
one region of this region type at any given time. A spacecraft
region assignment can be one of the following:
- Interplanetary medium,
- Dayside Magnetosheath, Nightside Magnetosheath,
- Dayside Magnetosphere, Nightside Magnetosphere,
- Dayside Plasmasphere, Nightside Plasmasphere,
- Plasma Sheet,
- Tail Lobe,
- LLBL (Low Latitude Boundry Layer),
- HLBL (High Latitude Boundry Layer - formerly known as the Mantle)
- RADIAL TRACED FOOTPOINT REGIONS - (2 dimensional zones) Such a
region is based on the location on the Earth's surface where a
straight line would intersect when connecting the spacecraft and
the Earth's center. A radial traced region assignment can be one
of the following:
- North Polar Cap, South polar Cap,
- North Cusp, South Cusp,
- North Cleft, South Cleft,
- North Auroral Oval, South Auroral Oval,
- North Mid-Latitude, South Mid-Latitude,
- Low Latitude
Note: The North and South Mid-Latitude regions are defined as the two bands about the Earth that extend from: +30 degrees latitude to the North Auroral Oval, and -30 degrees latitude to the South Auroral Oval. The Low-Latitude is the band that extends from +30 degrees latitude to -30 degrees latitude.
- NORTH B TRACED FOOTPOINT REGIONS - (2 dimensional zones) Such a region is based on where the magnetic field line that passes through the spacecraft intersects the Earth's surface in the Earth's northern magnetic hemisphere. North B traced footpoint region assignments are the same as the 'North' regions and the Low Latitude region used for assigning a radial traced footpoint region.
- SOUTH B TRACED FOOTPOINT REGIONS - (2 dimensional zones) Such a region is based on where the magnetic field line that passes through the spacecraft intersects the Earth's surface in the Earth's southern magnetic hemisphere. South B traced footpoint region assignments are the same as the 'South' regions and the Low Latitude region used for assigning a radial traced footpoint region.
2.3.4 Output Units/Formatting
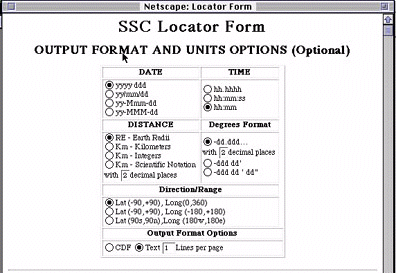
The Output Units/Formatting screen allows the user to select the format for the outputs for date, time, distance, degrees, and direction/range.

Standard Interface Output/Formatting Screen
In addition the user can select the number of lines per page. The default as shown in the figure above shows a value of 1 line per page in the output. This value will produce one header for each column instead of every XX number of lines. If the user enters a 0 in this field the output will have no column headers.
The user may also select to output the information into a CDF file. This will create as CDF file in the public FTP area. The user may then download this file.
. The bottom line of the command menu contains a pair of radio buttons labeled "Interface Style: Standard Advanced". The button is defaulted to the Standard button. However, at any time the user can select the Advanced button and when the next page is loaded the advanced interface will be shown. There are several major differences between the Standard and Advanced interfaces. The changes revolve around the Command Menu and the number of options that are available for filtering.

Advanced Interface Command Menu
As shown in the above figure there are now several more choices under the "Optional Settings". These additional options are an expansion of the available filtering options. As shown in the next four figures the filtering options are expanded to allow you to filter on any of the avaiable output parameters whether or not that parameter is included in the output.

Advanced Interface Spacecraft/Time Range Selection Screen
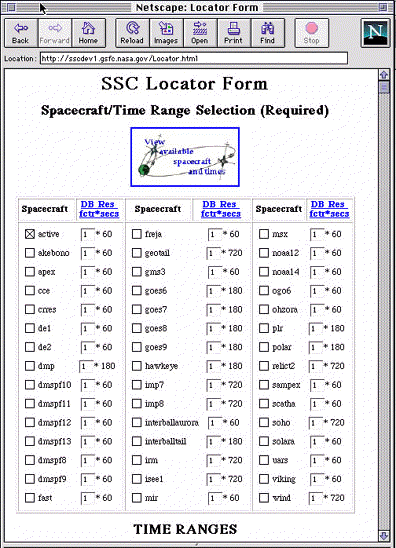
As shown in the figure the Spacecraft/Time Range Page has changed significantly. Upon closer examination though only on thing has really changed. Now instead of a single field to enter a "Database Resolution Factor" that applies to all spacecraft the user can specify a "Database Resolution Factor" for each spacecraft that is selected.

Advanced Interface Region Filter Screen
As shown in the figure above you can now filter based on any of the available coordinate systems as apposed to just those selected for output.

Advanced Interface Region Filter Screen
As shown in the figure above you can now filter based on any of the spacecraft region or trace region.

Advanced Interface Additional Filters Screen
As shown in the figure above you can now filter based on any distance parameters or field values.
 SSC
Users Guide - Table of Contents
- NASA Official: Robert Candey (301)286-6707, Robert.M.Candey@nasa.gov
- Curator: Tami Kovalick
- Last Modified:
